Create a plug-in for a REST based web service in minutes - Part 4
In part 1 and part 2 we created the inventory objects, in part 3 we created methods for this objects and ran a generic workflow to run these methods.
In this article we will create workflows for calling these methods, include them in a package with all the plug-in configuration to ship it to our end users.
Creating the workflows
The invoke workflows in the plug-in facilitate running REST operations. End users and or external system will expect simpler workflows. For this you can wrap the invoke workflows with your own set of dedicated CRUD workflows
Inside the workflow folder you created in the previous article create the workflows:
- Create a security tag
- Delete a security tag
- Apply a security tag to a VM
Edit the “Create a security tag” workflow
Drag and drop the Invoke a create object method on the schema.
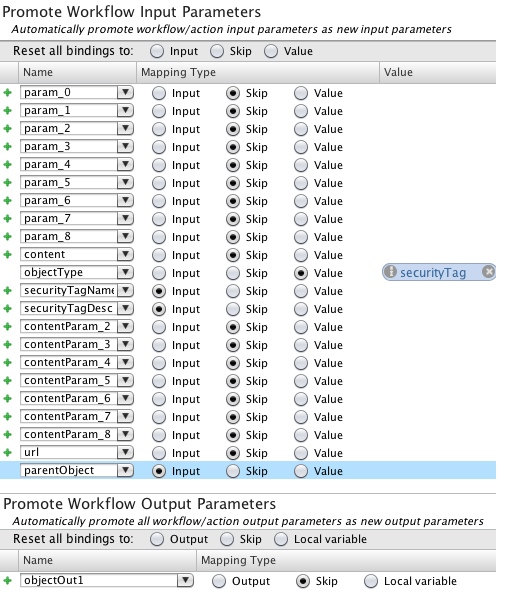
Click on the setup

Inputs :
- param_0 to 8: Skip
- content: Skip(this will be loaded by default)
- objectType : Value - securityTag
- contentParam_0 : rename as securityTagName input
- contentParam_1 : rename as securityTagDescription input
- contentParam_2 to 8: Skip
- url: Skip (this will be loaded by default)
- parentObject: Input
Outputs :
- objectOut : Skip
Then complete the following operations:
- Change the parentObject input type to DynamicTypes:NSX.NSXHost
- Add a securityTag output of type DynamicTypes:NSX.securityTag to the workflow
- Bind the object out output to the securityTag
- Validate the workflow . Reset the binding type.
- Run the workflow. Note that the securityTag variable will show empty but it is not. If you use “Create a security tag” workflow within another workflow you will be able to get to the properties of the securityTag object.
Edit the “Apply a security tag to a VM” workflow
Drag and drop the “Invoke an object method” on the schema.
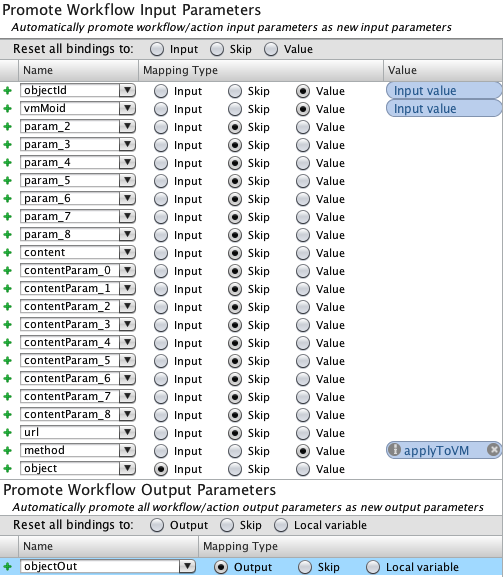
Click on the setup:

Inputs:
- param_0 : rename to “objectId” Value
- param_1: rename to vmMoid Value
- param_2 to 8 : Skip
- content: Skip (this will be loaded by default)
- contentParam_0 to 8: Skip
- url: Skip (this will be loaded by default)
- method: Value - applyToVM
- object: Value
Outputs :
- output : Output
Then complete the following operations:
- Rename the object input “securityTag” with a DynamicTypes:NSX.securityTag type
- Rename the object output “securityTagOut” with a DynamicTypes:NSX.securityTag type
- Add a vm VC:VirtualMachine input to the workflow
- Add a Scriptable task “Set inputs” before the invoke workflow to set objectId, vmMoid
objectId = securityTag.objectId; vmMoid = vm.id;
- Make sure you have all required inputs / outputs
- Add a securityTagOut output to the workflow
- Add a Scriptable task “Set output” and script to set the securityTag output with the objectOut variable
- Run the workflow
Edit the “Delete a security tag” workflow
Drag and drop the “Invoke a delete object method simple” on the schema.
Click on the setup. Inputs:
- object: Input
- params: Skip
- customHeader : Skip (A custom header can be used when required)
Then complete the following operations:
- Rename the object input “securityTag” with a DynamicTypes:NSX.securityTag type
- Run the workflow. Check the inventory.
Run the workflow. Check the inventory.
Deliver the plug-in to end users
Building a plug-in on your server in minutes to hours is a great thing, making it available to others is even better !
Follow this process:
- Run “Export plug-in configuration”. Select your namespace.
- You should see a dynamictypes-config-[date] package. Edit it.
- Rename it to something more appropriate (i.e com.vmware.plugin.dynamictypes.nsx)
- The plug-in already has all the necessary elements built in except for the workflows you created. Add these to the package and save.
- Export the package (without configuration element settings and global tags)
Importing and installing the plug-in as an End user
Import the NSX package you exported previously Check the workflows available in the Dynamic Type Plug-in Generator v2 folder. The workflows in the Developer folder are the one used by your workflows. The workflows in End User are the workflows necessary to Install the plug-in and add a host.
Run Plug-in Gen -1- Install a plug-in. Select the package you exported
In the inventory, select the newly created NSX2 namespace / Right click / “Plugin gen -2- Add a new host”
- Name : NSX
- URL : https://YourNSXHost
- Host authentication type: Basic / enter credentials
Check the inventory:
- Test the workflows:
- Create a security tag,
- Apply a security tag to a VM.
- Delete a security tag
Conclusion
The plug-in generator allows you to implement in minutes to hours a plug-in inventory objects and their methods and a way to deliver it when this takes hours to days (or even weeks or months) without it and a lot more knowledge.

