How to use the REST API to Start a Workflow
It seems everyday the interest in vCenter Orchestrator (vCO) is growing. I love this because it brings more and more use cases to our attention. One such use case is the need to call vCO workflows via its REST API. In order to keep this article generic, but useful, I will work with the free RESTClient plug-in/add-on for Firefox as the client. The general process here will be similar to what you may need to do from your software or portal to integrate with vCO’s REST API.
Tutorial Goal

So, with that in mind, the goal of this tutorial is to learn how to execute the “Hello Perl” workflow from this tutorial: How to run a Perl Script from a vCenter Orchestrator Workflow via the REST API.
In order to execute a workflow via the REST API, you must:
- Identify the format you wish to work in: REST/JSON
- Locate the Workflow ID you want to run
- Understand the proper body format to submit the workflow inputs in
- Understand how to check the status/results of the workflow
We’ll step through these various concepts, providing step-by-step instructions on what needs to be done for each.
Concepts Covered In this tutorial
The following concepts will be covered:
- Accessing the REST API and Documentation
- Setting headers to force JSON vs. XML
- How to filter GET results
- Finding a Workflow ID
- How to get proper XML/JSON format for input parameters via REST
- Executing a Workflow
- Checking Workflow results
Tools Used
The following tools are used for this tutorial:
- vCenter Orchestrator 5.5 Appliance (Important to use the 5.1.1 or newer version as there is a json issue in prior 5.x releases)
- Mozilla Firefox with the RESTClient installed
- Simple PERL Script from previous article
Accessing the vCO REST API and Documentation
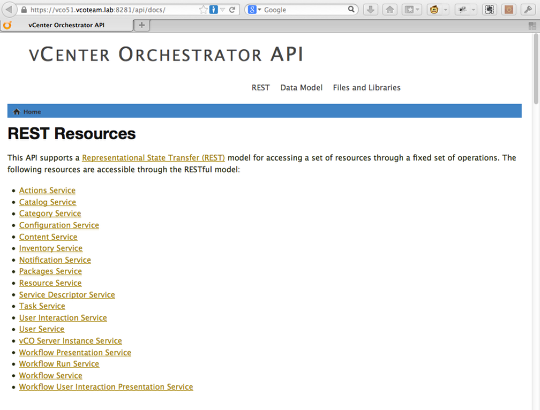
If you have a vCO 5.x server and newer (Windows or appliance) running then you have the REST API and its documentation readily available.
5.0 -> 5.1.x : The root url for the API is: https://:8281/api/
5.5 and newer : The root url for the API is: https://:8281/vco/api/
The root page for the documentation is found on your vCO server at https://:8281/vco/api/docs
Of particular interest for this article are the “Workflow Service” and “Workflow Presentation Service” links shown on that page. Those two pages provide considerable detail on how to get and execute workflows via REST. Take a moment to explore those two pages before continuing with this tutorial as I will not be re-documenting those pages here.
The goal of the process detailed in the next several steps is to identify the correct URL for the workflow we wish to run… but in order to do that, we must first locate the workflow in the api. This whole process is only needed when you are discovering the ID of a workflow for the first time. Once identified, your only concern will be around getting the inputs correct for a successful launch of the workflow.
Setting headers to force JSON vs. XML
The vCO REST API defaults to using XML. If you are more comfortable with, or your system uses, JSON then you can provide a header that tells vCO to expect and reply using JSON instead of XML. Let’s do that now with Firefox and the RESTClient plug-in (feel free to use the REST client of your choice - for the purposes of this article, the RESTClient will be used.)
Set Custom Header in RESTClient
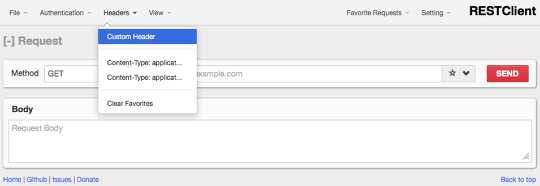
Click “Headers”, then click Custom Header
Accept: application/json
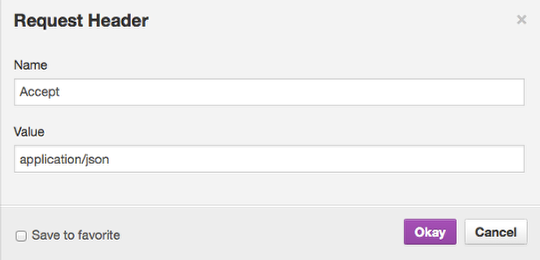
As shown in the screenshot above, set an “Accept” header with a value of “application/json” and click Okay for vCO 5.5. Now, whenever responses come back from the API they will be in JSON format.
**NOTE: If you are using vCO 5.1.1 there is a slight bug in the header. In order to get json responses, you must set the “Accept” header to a value of “application/json;v=5.1.1"
How to filter GET results
When accessing the /vco/api/workflows url of the REST API, the API will return XML (or JSON) results of ALL workflows on the server. Depending on the number of workflows (Several hundred on a clean install of vCO), it could take a while to get the results and perhaps longer to locate the workflow you wish to run. If you really want to see those results, go ahead and submit a GET to your vCO server - https://:8281/vco/api/workflows
In order to filter the results and likely find your exact workflow, adjust your GET url to include /?condition=name=
Note: If the workflow name has spaces, replace the spaces with %20
In this tutorial, we need to get the “Hello PERL” workflow so our api url will be:
https://:8281/vco/api/workflows/?conditions=name=hello%20perl
Note: The name of the workflow in the query is NOT case sensitive
Once you have run the workflow in the format of your choice (JSON/XML), you will need to identify the “id” of the workflow so that you can get the correct url to view the workflow and eventually run it. The best property in the results will actually be the “itemHref” as it provides the full URL (id included) to view the workflow. In my case, my id is 885edab8-4b31-466c-bfd4-9e2cd6db3b95 and the itemHref is https://vco55.vcoteam.lab:8281/vco/api/workflows/885edab8-4b31-466c-bfd4-9e2cd6db3b95/.
JSON Get Workflow Example
|
|
XML Get Workflow Example
|
|
Preparing to Run a Workflow
Once you have identified the execution URL, you are ready to prepare the Body of your REST message. As noted in the API Documentation for the Workflow Run Service, the endpoint url to POST to for running a workflow is: https://host:port/vco/api/workflows/{workflowId}/executions/
Additionally, pay close attention to the XML sample provided for the Body - it differs from what is received from the GET request we received earlier. In particular, your body must follow this format:
|
|
So that means, for my workflow that would be:
|
|
Depending on the object type of the inputs, the value will appear a little differently. You can see an example of this in the Workflow Run Service API documentation.
The above code prepares your inputs parameters if you’re using XML - but what about JSON? Ah, that is very simple:
|
|
NOTE: If you workflow does not require any inputs, then you must still provide a body of empty curly-braces: {}
That’s nice, but HOW did you figure that out?
Oh, right - you’ll need to figure out what YOUR inputs should look like. In order to do that most effectively:
- Run your workflow once using the vCO client - this way, you can put in all your inputs and have a workflow execution available with those inputs stored
- Now, do a GET request to your workflow executions: https://vco55.vcoteam.lab:8281/vco/api/workflows/885edab8-4b31-466c-bfd4-9e2cd6db3b95/executions/
- You should have one or more "
- Perform a GET request to one of your executions to see what the inputs look like
Here is the resulting XML and JSON results for the execution I noted above:
XML
|
|
JSON
|
|
The important code in the above code is in the “input-parameters” section of each example. You can see there the format of each of the input parameters.
NOTE: When building the body of your POST, be sure to use “parameters”, NOT “input-parameters”. Also, when using XML - be sure to use the “execution-context” tag as shown here and in the API documentation.
You now have:
- Header for receiving back JSON content
- Execution URL (endpoint address to POST)
- Format of body in XML or JSON
The final piece, IF using JSON, is to tell the vCO API that you are sending JSON content in your POST. This is pretty simple, just add another custom header:
Content-Type: application/json
Ready to Run! - JSON
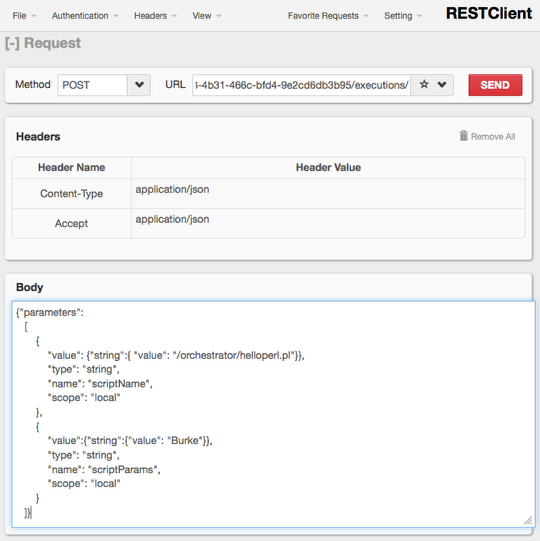
This screenshot shows what my RESTClient looks like when all of this has been brought together to run the workflow using JSON.
Required HEADERs to post using JSON: Accept: application/json Content-Type: application/json
Ready to Run! - XML
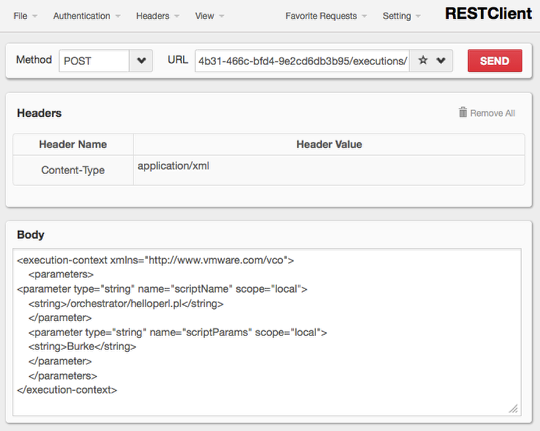
This screenshot shows what my RESTClient looks like when all of this has been brought together to run the workflow using XML.
Required HEADERs to post using XML: Content-Type: application/xml
NOTE: Accept is not required since the default response type is already XML.
Expected Results From POST
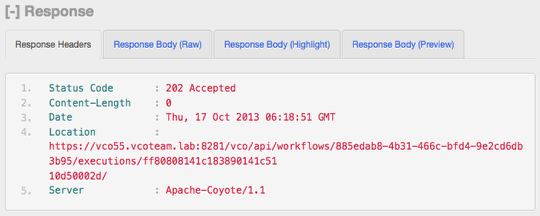
Regardless of which format you use for the body of your POST, the expected result is an EMPTY BODY and a set of response headers as shown in the image above.
The Status Code of 202 means that you successfully started a workflow - NOT that the workflow was successful. There is a big difference there. In order to determine whether or not a workflow run was successful, you need to perfrom a GET request on the URL in the Location header + “state” … so, for example, To see whether or not my run was successful, I would perform my GET against this url:
https://vco55.vcoteam.lab:8281/vco/api/workflows/885edab8-4b31-466c-bfd4-9e2cd6db3b95/executions/ff80808141c183890141c5110d50002d/state
Possible State Values
- waiting
- failed
- completed
- canceled
- running
Successful JSON State Example
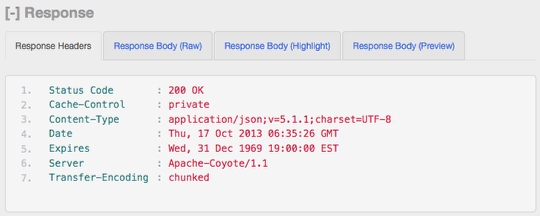
And for the Body:
{"value":"completed"}
Successful XML State Example
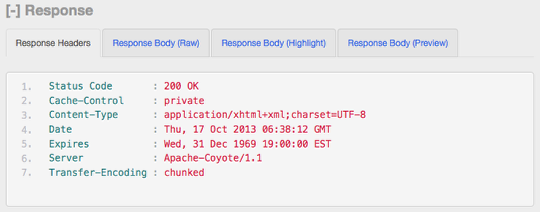
And for the Body:
|
|
Failure Example
The Response Headers for the state url will be the same for Success and failure - the difference will be in the body. A failed body looks like this:
JSON
{"value":"failed"}
XML
|
|
Failure Details
In the event of a failure, more details can be obtained by performing a GET request against the workflow execution. Earlier, I had you just do the get request against the workflow executiion url + /state since there is less parsing involved. Here’s what a workflow execution looks like:
JSON
|
|
XML
|
|
As you can see, there is quite a bit more content here.. In any case, to get the exception details, retrieve the value of the “content-exception”.
Conclusion
Throughout this tutorial, you have been provided details on:
- Locating a specific workflow’s ID using a filtered GET query against the REST API
- Identifying the correct Input parameters and the proper formatting to use (by looking at a past execution)
- Executing a workflow
- Retrieving workflow results
- Working with XML or JSON
You should now be able to execute workflows via the REST api.
How About SecureString Inputs
This topic was added on May 18th, 2015 after having numerous requests on the topic…. Here’s a JSON example of passing a SecureString input type:
|
|
Note that the parameter type is SecureString, but the actual value is designated as a string.
Next Steps
This article walked through the basics of getting a simple STRING Input based workflow to run. The next step would be to figure out how to get and provide complex objects as inputs to workflows via the REST API. Different approaches may be used here:
- Use the REST API Inventory:
https://[YOURVCOSERVER]:8281/vco/api/inventory– then drill down into the appropriate plug-in to find the object you need - Create a vCO workflow that you can run easily (string inputs or no inputs for example) that returns an array of the objects you need
When dealing with any input parameters, remember to execute a workflow first using the vCO client and then view that execution as described in the article above to see how the REST API formats the inputs for various object types. Note, however, that the value for SecureString inputs will not be displayed here as the values are not stored in the workflow token.
Good Luck!

